I used to subscribe to a super awesome monthly kit club produced by the company Button Farm. If you haven't heard of it, check it out here, it's fabulous and is always full of AMAZING and super great quality products.
I am finally getting around to actually doing (and posting) the projects from the kit and just had to share the amazing cards (and bags) I was able to make out of just ONE kit. And I had enough scraps leftover to make at least 6 more cards (which I used to make wine tags previously posted about).
Thanks for looking! Do you subscribe to any monthly kits/clubs for paper crafting? If so, share which one in the comments, I'd love to check them out!
Showing posts with label paper crafting. Show all posts
Tuesday, November 20, 2012
Friday, November 9, 2012
Stampin' Up Ornaments
I went to the lovely Lis Ljung's Stamp Camp a few months ago where we made the most adorable ornament (which is also featured in the most recent Stampin' Up holiday catalog). I absolutely fell in love with the ornament and wanted to make some on my own to give away as gifts this year. Problem was I didn't have pretty much any of the necessary supplies. Therefore, it was time to get creative and figure out a way to make a similar ornament with what I had on hand.
As you can see mine has different components. I don't have the die cut machine used for the original shapes, but I have the ornament punch and matching stamp set. I also used a heart stamp and punch for the interior layer. I hope you like my interpretation and thanks for looking! If you too would like to make an adorable ornament but don't have the right supplies don't get discouraged, GET CREATIVE! I would love to see what you come up with so please leave a link to your interpretation in my comments so I can check it out!
Here is the original
Here is my interpretation
As you can see mine has different components. I don't have the die cut machine used for the original shapes, but I have the ornament punch and matching stamp set. I also used a heart stamp and punch for the interior layer. I hope you like my interpretation and thanks for looking! If you too would like to make an adorable ornament but don't have the right supplies don't get discouraged, GET CREATIVE! I would love to see what you come up with so please leave a link to your interpretation in my comments so I can check it out!
Labels:
Christmas,
crafts,
DIY,
Holidays,
paper crafting
Tuesday, November 6, 2012
Post Halloween Post
So it's been a few days and I just didn't get a chance to get on here to give my post-Halloween update. We ended up having 212 kids who trick-or-treated, just a few shy of last year. We have some candy left over which means I have a stomach-ache. LOL.
We didn't dress up in costumes to pass out candy, but we did put some festive ears on.
Every year I give my husband a little Halloween treat. Think he liked it?
I decorate our front porch - this year hubby tore apart some pallets we got for free and made a fence which he painted black for me to decorate on the porch. My favorite decor of course are the jack-o-jars which are SUPER easy to make!
And I finally finished my fun wreath that I made!
Thanks for looking and I hope you all had a fabulous holiday!
We didn't dress up in costumes to pass out candy, but we did put some festive ears on.
Every year I give my husband a little Halloween treat. Think he liked it?
I decorate our front porch - this year hubby tore apart some pallets we got for free and made a fence which he painted black for me to decorate on the porch. My favorite decor of course are the jack-o-jars which are SUPER easy to make!
And I finally finished my fun wreath that I made!
Thanks for looking and I hope you all had a fabulous holiday!
Labels:
crafts,
DIY,
Fall,
Halloween,
Holidays,
paper crafting,
Thanksgiving
Sunday, October 7, 2012
Halloween Crafts
Been working on decorating the house and some fun Halloween/Fall crafts of late. Hoping to finish them up this week and get some photos up ASAP. Here is a sneak peek - hoping to turn this into some sort of wreath.
I can't believe it's October already! What kinds of crafts are you guys working on for the upcoming fall holidays?
Sunday, November 6, 2011
PaperCrafter's Makeover Monday Challenge # 1 - Wine Bottle Tag
I have completed Week 1's Makeover Monday Challenge hosted by Paper Crafter's Library. Each Monday they plan to post a challenge which you can create using your supplies on hand. I loved the idea of this wine bottle tag - a perfect way to dress up a wine bottle for a birthday or hostess gift, something I regularly give.
Here is my version of the wine tag - I used my scraps from September's Button Farm kit to create this tag - I'm very pleased with how it turned out. The tag is 3x7 and is scored at the 2" mark with a hole punched in the top to easily slide over the wine bottle's neck.
Thanks for looking at my attempt, and thanks to Paper Crafter's Library for a FABULOUS challenge - I had fun and it's definitely an item I look forward to making again - fast, easy, and cute, what's not to like!?
here is the link to the original challenge
Here is my version of the wine tag - I used my scraps from September's Button Farm kit to create this tag - I'm very pleased with how it turned out. The tag is 3x7 and is scored at the 2" mark with a hole punched in the top to easily slide over the wine bottle's neck.
Thanks for looking at my attempt, and thanks to Paper Crafter's Library for a FABULOUS challenge - I had fun and it's definitely an item I look forward to making again - fast, easy, and cute, what's not to like!?
here is the link to the original challenge
Friday, October 7, 2011
Planning my best friend's bridal shower - photo of invitations
As matron of honor (wow that makes me sound old), part of my task is to throw the bride, one of my best friends by the name of Caitlin, a bridal shower. Together with the other 5 bridesmaids, we will be throwing a hopefully elegant event at my house next month.
The first step of course is sending out invitations. I saw this adorable idea from my dear friend Heather. As soon as I saw it - back in July when she originally posted it - I instantly knew that this was going to be the bridal shower invitation. I wanted to add my own flair by creating the bouquet with rosettes rather than punched flowers.
The rosettes are created by punching a circle (I used a 1" circle punch), then cutting the circle in a spiral from the outside. You then start on the outside and roll the paper all the way, and voila, a rosette!
Here is the final product (again I apologize for my horrific photography skills).
I had the pleasure of personally giving this to the bride on Wednesday night and I was pleased that she seemed to like it. I look forward to posting more about the shower as we continue to plan and create.
On a fun note - you should have seen the bridesmaids responses (most of whom are not crafters) when I sent them a photo of Heather's card and said "this is what we're making". haha. Priceless. A big thank you to Kim, Kamila, my mother and the mother of the bride for coming over on a Saturday night and helping put together 30 of these bad boys.
TGIF everyone - we're off to Vegas!
The first step of course is sending out invitations. I saw this adorable idea from my dear friend Heather. As soon as I saw it - back in July when she originally posted it - I instantly knew that this was going to be the bridal shower invitation. I wanted to add my own flair by creating the bouquet with rosettes rather than punched flowers.
The rosettes are created by punching a circle (I used a 1" circle punch), then cutting the circle in a spiral from the outside. You then start on the outside and roll the paper all the way, and voila, a rosette!
Here is the final product (again I apologize for my horrific photography skills).
I had the pleasure of personally giving this to the bride on Wednesday night and I was pleased that she seemed to like it. I look forward to posting more about the shower as we continue to plan and create.
On a fun note - you should have seen the bridesmaids responses (most of whom are not crafters) when I sent them a photo of Heather's card and said "this is what we're making". haha. Priceless. A big thank you to Kim, Kamila, my mother and the mother of the bride for coming over on a Saturday night and helping put together 30 of these bad boys.
TGIF everyone - we're off to Vegas!
Tuesday, September 27, 2011
Tutorial Tuesday - super simple pennant centerpiece
Well I am doing a tutorial today (I know I actually crafted something OMG!) - but I forgot to take photos of the steps - so it will be a written tutorial. My bad!
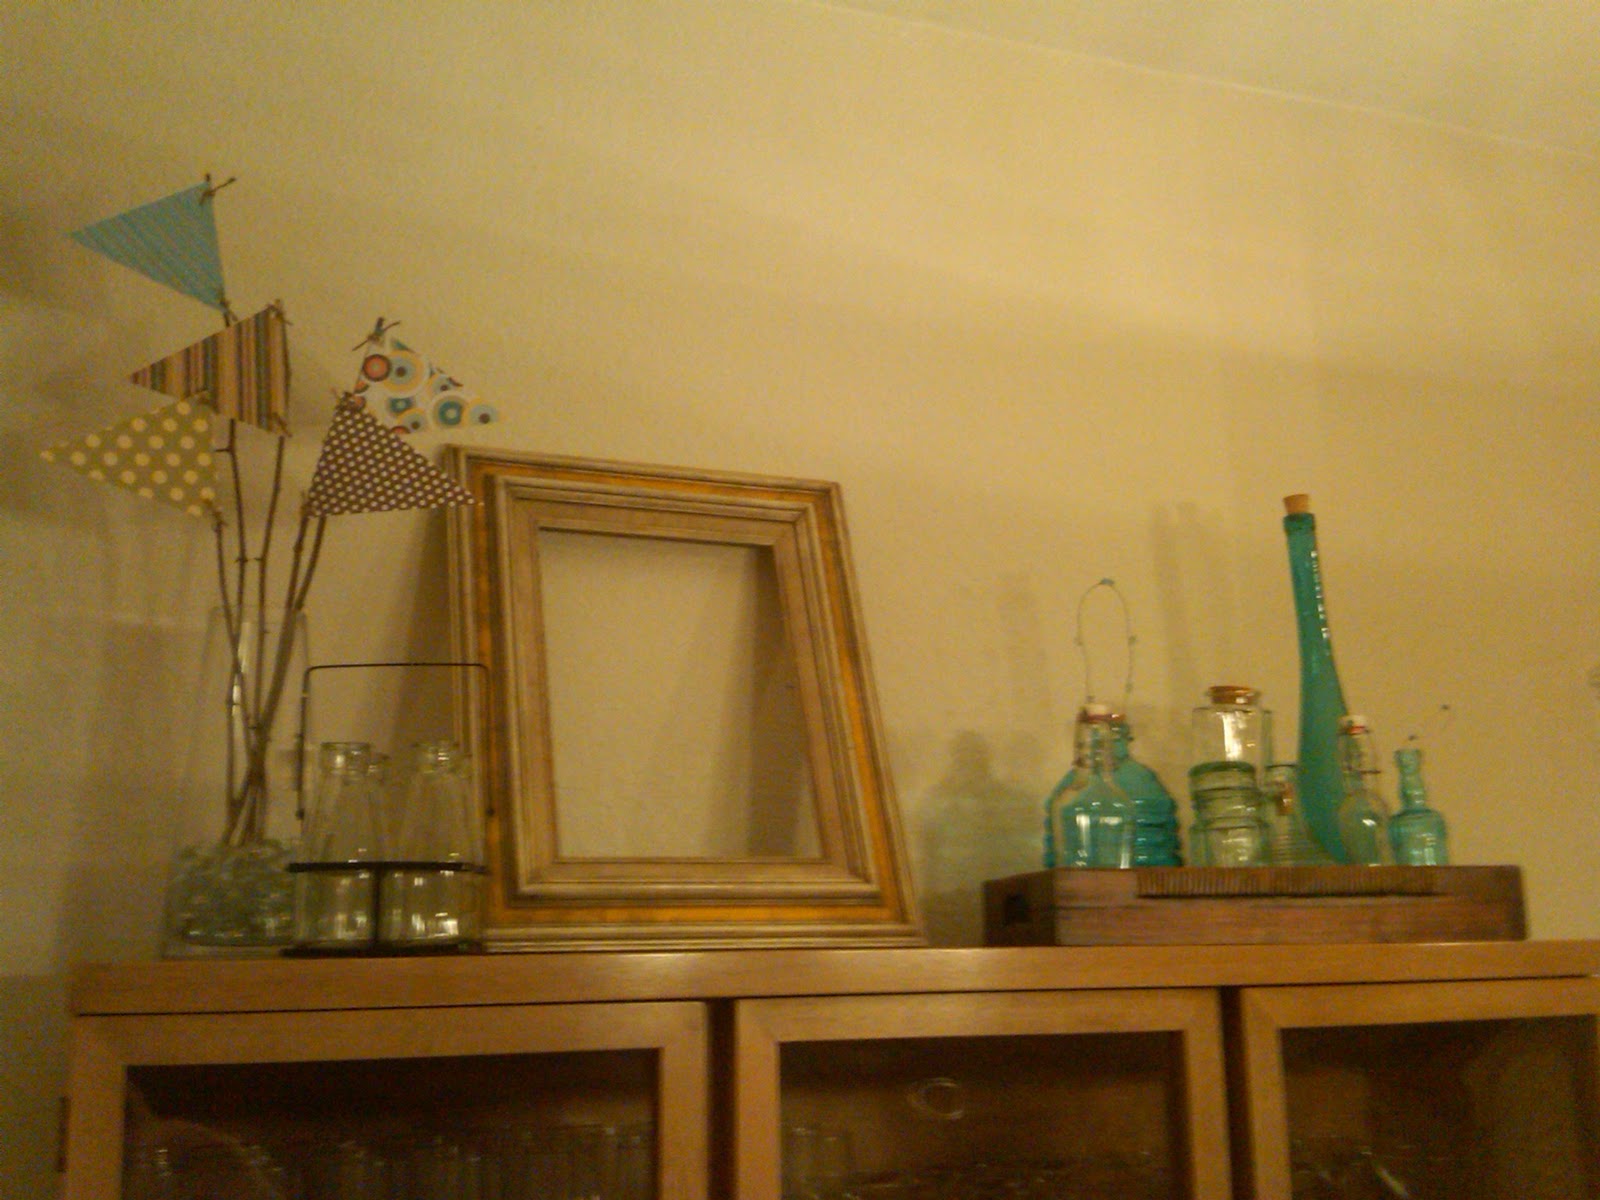
Well the top of my hutch looked like this (see below) - I didn't love the flowers as I didn't think they went, so I wanted to create something to go in its place, but still utilize the vase - something other than a floral arrangement as fake flowers are not my fave.
BEFORE
I saw a photo online which led me to the idea of pennants on sticks, so here is the after photo below (I did this quickstyle last night). What do you think, do you like the before or after better?
AFTER
SUPPLIES
- 5 complimentary patterned papers 6x6 or larger will work for this project - keep in mind that if you are using this as a centerpiece rather than against a wall, the papers will need to be double sided
- 5 twigs/sticks - i liked the natural look of the twigs - i purchased a bundle of twigs at michaels, cut off the wire holding the bundle together and trimmed them to the size i wanted them to be
- wire cutters or similar - basically something heavy duty to trim your twigs so they will be the height you desire
- vase
- something to fill the bottom of your face with - i used clear marbles, other ideas are stones, nuts, seeds, moss, etc.
- cropodile or hole punch
- twine or ribbon
- paper cutter
STEP ONE: cut your paper too be 4.5" by 5.5". Then mark with a pencil on the 4.5" side a dot at the 2.25" mark - angle your paper cutter to cut from one corner to the 2.25" mark you just made on both sides to create a pennant - I chose this size due to the size of my vase - you may make smaller or larger depending on your vase size - i recommend the width being 1" bigger than the height as I feel that made the proportions look correct.
STEP TWO: use your cropodile or hole punch to punch a hole in both corners of your straight edge
STEP THREE: use your twine to tie both corners to your twig/stick
STEP FOUR: have 3 of your flags point one direction and 2 point the other - trim your twigs to desired varying heights and display in your vase as desired.
VOILA! Easy cheesy :) Hope you enjoyed the super simple tutorial.
** I will attempt to get a close-up photo tonight and add to this post as requested.
Let me know what you think of my hutch - do you like the flowers or pennants best?
Sunday, September 25, 2011
Past Projects - 4th Edition
I made these birthday cards with some spring designer series paper from Stampin' Up. These cards might possibly be my favorite cards that I have ever made. I think they are. Anywho, thought I would share them as I am sharing some of my favorite past projects with you all. Enjoy!
** I am sorry the photo is such poor quality!
Saturday, September 24, 2011
Past Projects - 3rd Edition
More! haha. At least I have an archive of photos to choose from so I have SOMETHING to share. I am hoping to start crafting soon - I swear!
This is a project that I made in 2010 for a Valentine's Day gift exchange - the catch was the gift had to be home-made. I made this accordion style mini album/display. It was just a very simple mini album with not a lot of bling as I didn't want to over-embellish it without knowing the recipients style. I still was pleased with how it turned out :)
Front Cover
Front side
Back side (the white squares were for the recipient to replace with 3x3 photos of her choosing)
Thanks for looking!
This is a project that I made in 2010 for a Valentine's Day gift exchange - the catch was the gift had to be home-made. I made this accordion style mini album/display. It was just a very simple mini album with not a lot of bling as I didn't want to over-embellish it without knowing the recipients style. I still was pleased with how it turned out :)
Front Cover
Front side
Back side (the white squares were for the recipient to replace with 3x3 photos of her choosing)
Thanks for looking!
Thursday, September 22, 2011
Past Projects - 2nd Edition
Yet another post highlighting some of my favorite past projects while I continue to be lazy and not have anything current to post.
Here are some pinwheel cards I made a while back - they were the easiest things I've ever made - and I thought a great card for a male. Men's cards are hard to make sometimes, so I was thrilled that I could whip these out quickstyle.
As always, thanks for looking!
Here are some pinwheel cards I made a while back - they were the easiest things I've ever made - and I thought a great card for a male. Men's cards are hard to make sometimes, so I was thrilled that I could whip these out quickstyle.
As always, thanks for looking!
Monday, September 19, 2011
Past Projects
Since I have been a major slacker in the crafting department lately, I thought I would share photos of some of my past projects so that you could have some eye candy despite my slacker status.
This is a set of 10 cards I made all using the same distressed flower idea - all 10 are different and could be given or sold as a card set. The idea is SUPER simple. I had fun making them and think they turned out too cute. I made these back in early 2010 and have since given all 10 of the cards out. I do obviously need to work on my photo-taking skills still (oops).
Thanks for looking. I promise I will be crafting soon - I'm almost done organizing my craft supplies that have been packed in boxes in my garage for over a year (when we bought the house). After I organize I will finally be able to access my tools and junk so I can get started :)
Happy Monday all!
This is a set of 10 cards I made all using the same distressed flower idea - all 10 are different and could be given or sold as a card set. The idea is SUPER simple. I had fun making them and think they turned out too cute. I made these back in early 2010 and have since given all 10 of the cards out. I do obviously need to work on my photo-taking skills still (oops).
Thanks for looking. I promise I will be crafting soon - I'm almost done organizing my craft supplies that have been packed in boxes in my garage for over a year (when we bought the house). After I organize I will finally be able to access my tools and junk so I can get started :)
Happy Monday all!
Saturday, August 6, 2011
Stamp Camp creations
I attended two Stamp Camps courtesy of Stampin' Up demonstrator Lis Ljung over the past 2 months. We created 12 GORGEOUS projects and I just had to share with you some of my favorites.
To see all 12 projects, take a looksie at my post on my craft forum, Miss Imagination, here. PS: Membership is free to join Miss Imagination and we would love to have you!
Well the hubby and I decided to have an impromptu yard sale today, so wish us luck!
Altered Notepad
Butterfly card
These are post-its on a ring!
Adorable gift bag (we also made a matching card).
I just love how elegant this card turned out.
To see all 12 projects, take a looksie at my post on my craft forum, Miss Imagination, here. PS: Membership is free to join Miss Imagination and we would love to have you!
Well the hubby and I decided to have an impromptu yard sale today, so wish us luck!
Saturday, April 2, 2011
DIY - Unique Bridal Shower/Wedding Gift Idea
This framed art, featuring the date of the couples' big day is a super easy, but fun gift to give for a bridal shower or even a wedding.
I am attending a shower this afternoon and had seen this idea several weeks ago on a fellow bloggers' blog (I am so sorry I forgot to make a note of who's blog this was, so if it was yours please contact me so I can add your link here). I whipped this up in no time!
Here is a quick run down of how you can create this unique gift as well.
Supplies:
- nice frame featuring 3 photos all the same direction (I chose a frame with 3 5x7 photos)
- 3 coordinating designer papers (or you can stamp your own)
- a cutter to cut said designer paper to 5x7
- 1 piece of solid cardstock for the numbers (must know the wedding date!)
- a big shot or cricut cartridge with a font you like (I used my Cricut Storybook font - setting at 5")
Directions
1) cut your 3 background papers into 3 5x7 pieces
2) cut your numbers with the date of the wedding (I used a 5" setting as I felt it would be the perfect size for the 5x7 photos, if you have a smaller frame you may want to use a smaller font)
3) tape number onto center of background pages and place in photo windows
TADA! That's it! How easy is that!?
This would also be a cute gift for a new baby (of course after the baby is born so you get the right birth date).
Thanks for looking!
Thursday, March 31, 2011
DIY - Pomander Flower Balls
I got this fabulous idea from the Pizzazzerie blog. I just adored it and knew immediately that I had to do it myself.
Here is what I started with
I decided to utilize these already on my mantel - here is the before look
And the after (a close up is at the top of this post)
My mantel so far with the flower balls and bunny garland. It's a work in progress. I still have a few more Spring items up my sleeve that I hope to add to my mantel over the coming weeks.
Thanks for reading! If you want to try these - I bought 5 pieces of glitter paper for mine and used almost 4.5 pieces. About 1.5 pieces per ball. I easily made these while watching TV, it was easy just time consuming. I love the outcome and think it was well worth the time spent.
Wednesday, March 9, 2011
DIY - Easter Bunny Garland
I finally got around to creating the Easter Bunny Garland I previously featured in my Tuesday March 1, 2011 edition of Tuesday Tutorials.
I got this fabulous template and idea from my favorite website Hostess with the Mostess's blog - you can find the template/directions here.
I chose a pastel look rather than the vibrant bolds featured on Hostess's blog for 2 reasons - 1) my Easter decor that I have is mostly pastel and 2) I already had the paper in stock so I didn't have to go out and purchase anything other than the ribbon. The paper I used was K&Company Specialty Paper - Sparkly Sweet. I think it's perfect for this craft. The ribbon was just a no brand from JoAnn's that I picked up the other day when I was purchasing supplies for the diaper cake (which you can find posted here).
This was an extremely easy project and I think the end result is mighty cute! I would like to find a better way of adhering it to my mantel other than tape - my husband won't let me put holes (nails) in the mantel. Boo.
Thanks for looking!
p.s.: I realize I need to stop taking photos with my camera phone because the quality of the photo is terrible - you can't even see the details on some of the paper patterns. Eek, sorry guys!
Sunday, February 6, 2011
Jenny's Baby Shower Invitations
I was given the task of creating the baby shower invitations for one of my dear friends baby showers which will take place next month.
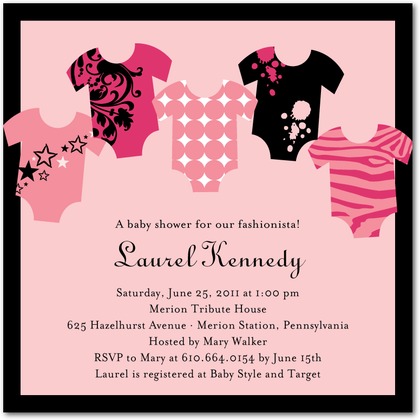
Her mother sent me the below picture as a sample idea of what the mama-to-be picked out to give me an idea of what she liked.
My friends' colors are pink and brown. Mine would be hand made, so I needed to brainstorm as to how to incorporate this idea my friend liked into a homemade card.
I immediately ordered a Cricut cartridge titled New Arrival from ebay. This cartridge included a onesie design that I thought would work perfectly. Next, a girlfriend and I went to our local Michael's to pick out some paper. Unfortunately the store only had 3 small print pink and brown patterned paper, so it was time to get creative.
After several hours of brainstorming, I came up with the following design:
I just have to finish the interior which will be all of the details (who, where, when, etc).
It's my first time crafting since before the wedding (August). Feels so nice to be back at it :)
Her mother sent me the below picture as a sample idea of what the mama-to-be picked out to give me an idea of what she liked.
My friends' colors are pink and brown. Mine would be hand made, so I needed to brainstorm as to how to incorporate this idea my friend liked into a homemade card.
I immediately ordered a Cricut cartridge titled New Arrival from ebay. This cartridge included a onesie design that I thought would work perfectly. Next, a girlfriend and I went to our local Michael's to pick out some paper. Unfortunately the store only had 3 small print pink and brown patterned paper, so it was time to get creative.
After several hours of brainstorming, I came up with the following design:
I just have to finish the interior which will be all of the details (who, where, when, etc).
It's my first time crafting since before the wedding (August). Feels so nice to be back at it :)
Subscribe to:
Posts (Atom)